
Friday, December 25, 2015
Wednesday, December 23, 2015
Ultimate Chocolate Granola
I usually stick with variations of my go-to granola recipe -- it's quick, easy, and makes for a healthy breakfast with yogurt and fruit. But sometimes it's fun to get a little fancy, as with this chocolate granola. The granola gets serious chocolate flavor from both cocoa powder and chocolate chips. It's also got some serious salty-sweet magic going on with sprinkles of both turbinado sugar and flaky salt to finish. Of course this granola is good with yogurt, but I'm not going to lie -- I could not stop eating it every time I walked past the container!


Ultimate Chocolate Granola (adapted from Pinch of Yum, original recipe here)
Makes about eight 1/3-cup servings
Spray oil
1-1/2 cups rolled oats
1/2 cup cashews
3/4 cup unsweetened coconut flakes
1/4 cup cocoa powder
1/4 cup turbinado sugar, divided
Generous pinch of salt
1/3 cup melted coconut oil
3 T maple syrup
1/2 tsp vanilla extract
1/2 cup chocolate chips
Coarse salt, to finish (i.e. flaky sea salt or kosher salt)
1. Preheat the oven to 250 degrees and line a large baking sheet with foil. Spray lightly with oil.
2. Mix together the oats, cashews, coconut flakes, and turbinado sugar in a large bowl. Reserve about a tablespoon of the turbinado sugar in a small bowl, and add the rest to the oat mixture along with a generous pinch of salt.
3. Pour in the coconut oil, maple syrup, and vanilla extract. Stir well so that everything is combined. Spread onto the baking sheet in an even layer.
4. Bake 50 minutes. Don't shake or stir the pan unless the granola seems to be over-browning.
5. Sprinkle the chocolate chips over the granola and return to the oven for 5 minutes. Remove from the oven, and sprinkle over the reserved turbinado sugar along with a generous sprinkle of coarse salt.
6. Let cool for at least an hour or two before gently transferring to a storage container.
Sunday, December 20, 2015
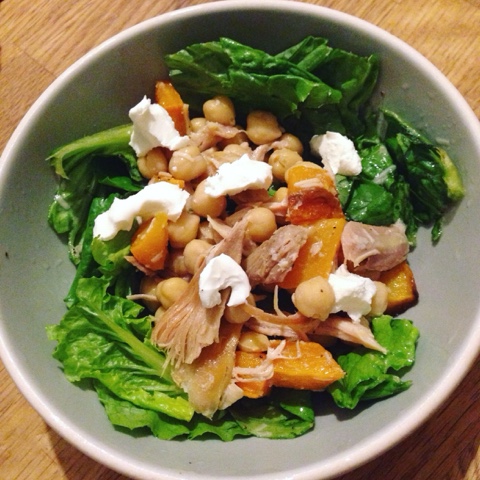
Butternut, Chickpea, and Chicken Salad with Parmesan Dressing
This has been a semi-crazy fall, which has meant a lot of delivery and frozen pot pies (I know!). It has definitely left me craving fresh ingredients and salads. This salad is pretty quick to pull together, although you do have to plan some time for the squash to roast (this could be done ahead, depending on your schedule). Sweet butternut squash is combined with rotisserie chicken, nutty chickpeas, and creamy goat cheese for a great combination of flavors and textures. Everything comes together with a quick Parmesan-red wine vinegar dressing that nicely balances richness and acid.
This recipe is inspired by one from Robin of The Balanced Life. I love love love Robin's online Pilates videos, and she also sends out recipes as part of her monthly Pilates membership community. The original recipe had avocado in place of the goat cheese, which I think would also be delicious -- I just couldn't find one that wasn't rock hard at the grocery. But if you've got ripe avocados on hand, that would be a fantastic sub for the cheese.
Butternut, Chickpea, and Chicken Salad with Parmesan Dressing (adapted from Robin of The Balanced Life)
For the dressing:
1/4 cup olive oil
1/4 cup grated Parmesan cheese (use a Microplane to get extra fine ribbons)
Juice of 1 lemon
2 T red wine vinegar
2 tsp honey
1 garlic clove, minced
Salt and pepper
For the salad
1/2 butternut squash, peeled and chopped
Olive oil
Salt
pepper
1 rotisserie chicken leg (drumstick and thigh), shredded
1 can chickpeas, drained and rinsed
Chopped romaine lettuce
Crumbled goat cheese
1. Put all the dressing ingredients in a jar with a tight-fitting lid. Screw on the lid and shake well to combine. Set aside.
2. Preheat the oven to 400 degrees. Toss the squash with olive oil, salt, and pepper, and arrange in a single layer on a baking sheet. Roast until tender, about 20-30 minutes, tossing once midway through roasting.
3. Combine the squash, chicken, and chickpeas in a large bowl. Add a good drizzle of the dressing and toss to combine.
4. Separately, toss each portion of lettuce with more dressing. Top the greens with a scoop of the squash-chicken mixture, and then top with crumbled goat cheese.
This recipe is inspired by one from Robin of The Balanced Life. I love love love Robin's online Pilates videos, and she also sends out recipes as part of her monthly Pilates membership community. The original recipe had avocado in place of the goat cheese, which I think would also be delicious -- I just couldn't find one that wasn't rock hard at the grocery. But if you've got ripe avocados on hand, that would be a fantastic sub for the cheese.

For the dressing:
1/4 cup olive oil
1/4 cup grated Parmesan cheese (use a Microplane to get extra fine ribbons)
Juice of 1 lemon
2 T red wine vinegar
2 tsp honey
1 garlic clove, minced
Salt and pepper
For the salad
1/2 butternut squash, peeled and chopped
Olive oil
Salt
pepper
1 rotisserie chicken leg (drumstick and thigh), shredded
1 can chickpeas, drained and rinsed
Chopped romaine lettuce
Crumbled goat cheese
1. Put all the dressing ingredients in a jar with a tight-fitting lid. Screw on the lid and shake well to combine. Set aside.
2. Preheat the oven to 400 degrees. Toss the squash with olive oil, salt, and pepper, and arrange in a single layer on a baking sheet. Roast until tender, about 20-30 minutes, tossing once midway through roasting.
3. Combine the squash, chicken, and chickpeas in a large bowl. Add a good drizzle of the dressing and toss to combine.
4. Separately, toss each portion of lettuce with more dressing. Top the greens with a scoop of the squash-chicken mixture, and then top with crumbled goat cheese.
Friday, December 18, 2015
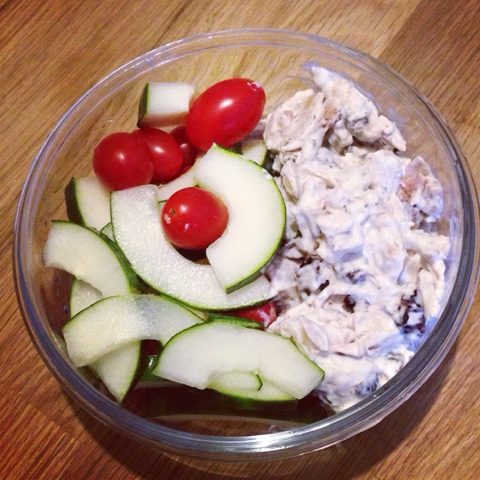
Lunch Box: Greek-Style Chicken Salad
I have become a big fan of picking up rotisserie chicken at the store to speed up the prep of dishes like soup and enchiladas. Here, shredded rotisserie chicken is mixed into a creamy sauce to create a tasty chicken salad. Chopped dried cherries and pickled onions jazz things up flavor wise - you could also add chopped fresh herbs for even more flavor. What makes this chicken salad extra fun is what you serve with it. Rather than making a sandwich that might get soggy by lunchtime, pack your container half-full with fresh veggies, and pack a pita chips on the side. Use the chips for dipping at lunch for maximum crunch!
Greek-Style Chicken Salad (adapted from Cooking Light)
Serves 2
3 T mayonnaise
2 T plain Greek yogurt
Juice of 1/2 lemon
Freshly ground black pepper
1 heaping cup shredded rotisserie chicken
2 T minced maple pickled onions or minced shallots
1/4 cup minced dried cherries
To serve: sliced cucumber, cherry tomatoes, and pita chips
Stir together the mayo, Greek yogurt, lemon juice, and black pepper. Add the chicken, onions, and cherries and gently stir to combine. Divide between two lunch containers, and add cucumbers and cherry tomatoes on the side. Pack pita chips in a separate container or bag so they don't get soggy.
Previous lunch box dishes: Bleu Apple Salad * Quinoa Salad with Tofu, Fresh Corn, Scallions, and Cashews * Lentil-Quinoa Yoga Bowl * Fennel-Potato Soup with Black Beans * Green and Yellow Vegetable Soups * Lemon-y Barley Salad * Asian-Style Split Pea Soup
Tuesday, December 15, 2015
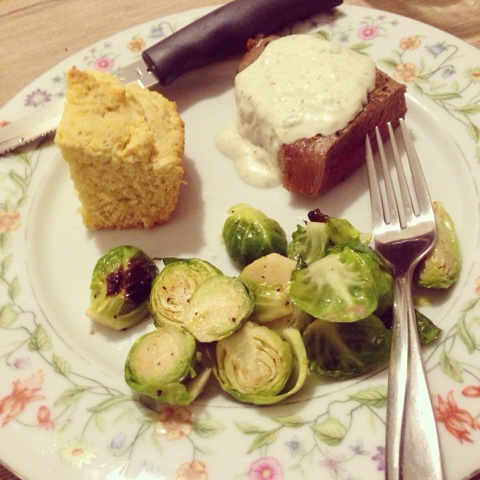
New York Strip Steak with Blue Cheese Sauce and Brussels Sprouts
I am in love with this recipe because it is seriously easy to make, but definitely fancy enough to serve to guests -- we served it to my parents-in-law when they were visiting and it was a big hit. The only time-consuming part is trimming and slicing the Brussels sprouts -- as you can see in the photo, I did more halves, and they were a little too crunchy -- I would definitely slice thinner next time. You could also go with something like haricots verts as a quicker option, too. The sprouts get spread out on a sheet pan, topped with a wire rack, and then steaks go on the top layer. This means the sprouts get extra flavor from the steak drippings - yum! Everything goes under the broiler for just a few minutes, and then the steak is topped with a super fast, 4-ingredient blue cheese sauce. The sauce is pretty mild because the blue cheese is cut with sour cream, so even blue cheese skeptics may enjoy it. Bonus: this meal is gluten free, if that's something you need (we served it with gluten free cornbread).
New York Strip Steak with Blue Cheese Sauce and Brussels Sprouts (adapted from Fine Cooking)
Serves 4
20 ounces Brussels sprouts, thinly sliced
Olive oil
Salt and pepper
1-inch-thick New York strip steaks (about 1-1/2 pounds to 2 pounds will serve 4, depending on appetite)
1/4 cup sour cream
1/4 cup crumbled blue cheese
1 tsp white wine vinegar
2 scallions, trimmed
1. Position a rack about 6 inches from the broiler and preheat the broiler to high.
2. Line a large rimmed baking sheet with foil and spray with oil.
3. Toss the Brussels sprouts with a generous pour of oil and season with salt and pepper. Arrange in a single layer on the baking sheet. Cover with one or two wire racks set on top of the Brussels sprouts.
4. Brush the steaks with oil, and season both sides with salt and pepper. Place on the rack.
5. Broil, flipping once, until the sprouts are a little charred and the steak is cooked to your liking, about 3-5 minutes per side for medium rare.
6. Meanwhile, puree the sour cream, blue cheese, vinegar, and scallion in a mini chopper or blender. Season with salt and pepper. Transfer to a small bowl and set aside.
7. Cover the steak and sprouts with a large piece of foil, and let rest about 10 minutes. Then serve, along with the blue cheese sauce.
Saturday, December 12, 2015
Peanut Butter-Marshmallow Christmas Candy
This is one of my favorite Christmas candies, based on a recipe that my aunt makes. It may not be pretty, but it is so yummy! You've got sweetness from white chocolate, lots of peanut flavor from both peanut butter and peanuts, crispy Rice Krispies, and chewy mini marshmallows. Plus, these take just a few minutes to stir together. Perfect Christmas sweetness!

Peanut Butter-Marshmallow Christmas Candy
Makes about 2 dozen
10 ounces white chocolate
7 T chunky peanut butter
1/2 cup dry roasted peanuts
1/2 cup mini marshmallows
2/3 cup Rice Krispies
1. Chop the white chocolate. Place in a bowl with the peanut butter, and melt in the microwave in 30 second increments, stirring each time.
2. Stir in the peanuts, marshmallows, and Rice Krispies.
3. Drop by spoonfuls on wax paper. Stick in the fridge until set, and then transfer to a container to store. The candies should be fine at cool room temperature.
Thursday, December 10, 2015
Pumpkin Spice Bread Pudding
We're a little past pumpkin spice season, but you should definitely still make this bread pudding! I forget how super simple bread pudding is until I actually make it, and then I am very happy. This dish takes the usual bread pudding formula and switches it up with added pumpkin puree, pumpkin spices, and mini chocolate chips (because why not?!). The dish is super decadent and delicious, and absolutely perfect with a scoop of vanilla ice cream on top. Take things over the top with a homemade caramel sauce -- this one is from the Baked Elements cookbook. Although making your own caramel sauce can sound a little intimidating, it's actually pretty easy - just be careful when you add the liquid at the end since it can bubble up.

Pumpkin Spice Bread Pudding
1 T butter
White sugar
6 large eggs
3 cups half and half
2/3 cup pumpkin puree
1/2 cup brown sugar
1 T pumpkin pie spice
1-pound loaf brioche, stale or lightly toasted, cubed
1/2 cup mini chocolate chips (or more, however you like)
For the caramel:
3/4 cups sugar
2 T corn syrup
1/2 stick butter, softened and cut into small cubes
3/4 cup heavy cream
Generous pinch of salt
1. Preheat the oven to 375 degrees. Grease a large baking pan with the butter, and then dust with sugar.
2. Whisk together the eggs, cream, purmpkin, brown sugar, and pie spice. Add the bread, and toss to combine. Transfer to the prepared pan and sprinkle with chocolate chunks. Bake 40-45 minutes.
3. Make the caramel sauce. In a medium saucepan, combine wht sugar and corny syrup with 1/4 cup water. Stir gently, cooking over medium-high heat, until the sugar dissolves. Increase heat to high, and, without stirring, allow the mixture to boil. Once it is a rich caramel color, remove from heat. Stir in the butter and cream. Stir to make sure everything is smooth, and use immediately or store in the fridge (microwave briefly to use).
Monday, December 7, 2015
Lunch Box: Comforting Chicken Curry with Baby Spinach
I've been pretty bad about prepping lunches ahead on the weekend lately, but this recent dish is definitely a winner. First of all, it's very quick and has a pretty short ingredient list -- I made it in a skillet while prepping other things on a weekend afternoon, and it didn't feel like a major chore. Plus, it's got a good balance of protein and veggies, plus a whole grain if you serve it over brown rice. I wilted fresh spinach into the sauce right at the end, but if you have leftover steamed veggies, you could mix those in instead or in addition to the spinach -- I think green beans or carrots would work especially well. Despite what seems like a lot of curry paste, this dish isn't too spicy, and it keeps well in the fridge until you're ready to eat. This dish is especially good to make this time of year, since the creamy coconut milk puts it firmly in comfort food territory.

Comforting Chicken Curry with Baby Spinach (adapted from Honest Cooking, original recipe here)
Serves 4 (lunch portions)
2 T oil
2 tsp minced garlic
2 tsp minced fresh ginger
2 T Thai red curry paste
1 pound boneless, skinless chicken thighs, in bite-sized pieces
1 cup coconut milk
2 generous handfuls baby spinach
Brown rice, to serve (if you're feeling fancy, prepare it using the leftover coconut milk for part of the liquid)
1. Heat the oil in a skillet over medium-high heat. When it's hot, add the garlic and ginger and fry for a minute or so, until fragrant. Add the curry paste and fry for another minute.
2. Add the chicken, stir well to combine, and cook until just browned. Then add the coconut milk, bring to a boil, and reduce heat to a simmer. Simmer until the chicken is cooked through.
3. Stir in the spinach until just wilted. Let cool, then divide among 4 lunch containers, each with a scoop of brown rice.
Friday, December 4, 2015
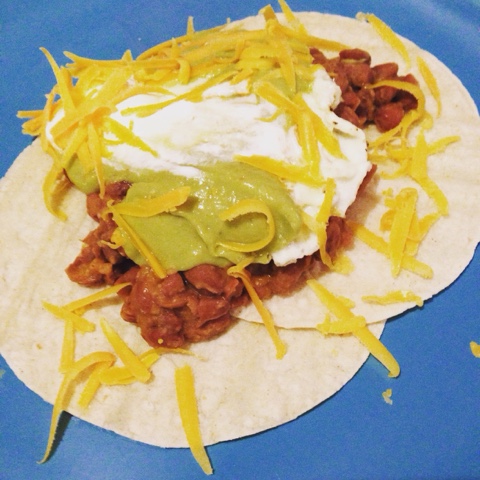
Vegetarian Huevos Rancheros
I love huevos rancheros -- they're one of my favorite items to order at Mexican restaurants, and they're also easy to make at home. This version departs from the usual recipe in that there's no red sauce -- instead, avocados and salsa verde are combined to make a delicious, creamy green sauce. The other special component of this dish is homemade refried beans -- start with high quality dried beans for an extra special dish, or use canned beans for a quicker dinner. The beans are mashed and sauteed with spices and onion, and then spooned on top of warm tortillas. Add the avocado-salsa verde sauce, an over easy egg, and then whatever toppings you like (we used cheese and sour cream). Yum!

Vegetarian Huevos Rancheros (adapted from Cookie and Kate, original recipe here)
For the beans:
1 cup Red Nightfall beans [or substitute 2 cans black or pinto beans]
1 T olive oil
1/2 onion, finely chopped
1/2 tsp chili powder
1/2 tsp cumin powder
Salt and pepper
1/2 lime
For the avocado salsa verde:
7-9 ounces salsa verde
1 ripe avocado
1 garlic clove, roughly chopped
juice of 1/2 lime
To serve:
Corn tortillas
Eggs, cooked however you like them
Shredded cheddar cheese
Sour cream
1. Soak the beans overnight. Drain, then place in a pot and cover with water by a few inches. Simmer for 60-90 minutes, until tender. Drain, reserving the liquid from the pot.
2. In a non-stick skillet, heat the olive oil over medium heat. Add the onion, and cook, stirring often, until softened.
3. Add the cooked beans, along with the chili powder and cumin, to the skillet. Season with salt and pepper. Cook over low heat, stirring often and smashing some of the beans with the back of a spatula as you go. Add some of the bean cooking liquid as you go if things are looking too dry. Just before serving, stir in the juice of 1/2 lime, taste, and adjust for seasoning.
4. Meanwhile, combine the salsa verde, avocado, garlic, and lime juice in a food processor or blender. Puree until smooth.
5. Warm the tortillas and cook the eggs to your liking (we did over easy).
6. Assemble the huevos rancheros -- layer tortillas with beans, eggs, and avocado salsa verde. Top with sour cream and shredded cheese, along with any other toppings that you like.
Subscribe to:
Posts (Atom)