Sunday, November 30, 2014

Secret Recipe Club: Winter Abundance Bowl

My partner for this month's Secret Recipe Club was Leigh of Chit Chat Chomp.  At first, I thought I'd want to make one of Leigh's fabulous-looking tarts.  Take a look at these salted spiced pumpkin tarts, the glorious sticky hazelnut toffee tart, or a deep dark chocolate tart.  Yum!  As it turned out, we ended up a little overloaded on sweets and rich foods and instead found refuge in Leigh's winter abundance bowl.  This is the perfect recipe to have in your back pocket during the holiday season.  It makes a delicious light dinner full of bright vegetables that really hits the spot after a weekend of over-indulgence.  But, at the same time it's warm (instead of cold like a salad) and features a kick-ass creamy dressing, so it matches my need for comfort on cold winter nights.

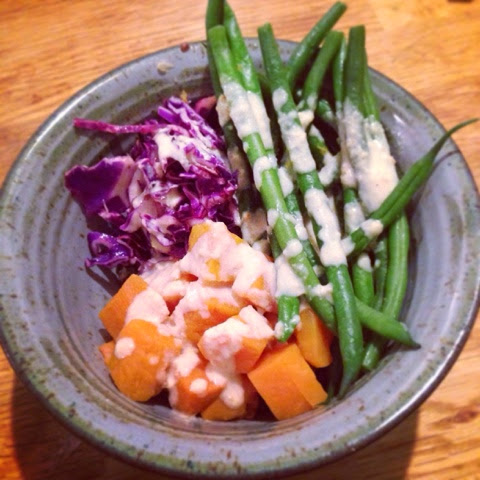
I made a few substitutions based on what I had on hand (as well as replacing the broccoli with green beans because my fiance is violently opposed to broccoli!), but the main components of the dish remain the same.  A warm, whole grain-lentil mixture forms the base of the dish.  I subbed in quick-cooking farro, red quinoa, and red lentils for Leigh's brown rice and green lentils to speed things up a bit, and the switch means this dish can be ready in about 20 minutes.  Next come bright veggies: tender orange sweet potatoes, bright green beans, and crunchy red cabbage with a hit of lime.  If you're making the dish after lots of holiday craziness, do yourself a favor and buy everything pre-cut.  It makes the dish even quicker and can be fairly cost effective if you shop at a store like Trader Joe's.  Finally, everything gets drizzled with a super-tasty ginger-cashew dressing.  It's a little sweet, a little lemon-y, and a lot delicious, and really brings all the elements of the dish together.  If you have leftovers, this dish is also fantastic room temperature for lunch the next day.


Winter Abundance Bowl (adapted from My New Roots, via Chit Chat Chomp)
Serves 3-4

1/3 cup Trader Joe's 10-minute quick-cooking farro
1/3 cup red quinoa
1/3 cup red lentils
Salt
1 large sweet potato, peeled and cubed
12 ounces thin green beans, trimmed
2 cups shredded red cabbage
Olive oil
Juice of 1 lime

For the dressing:
1 clove garlic
A large knob of fresh ginger, peeled and coarsely chopped
1/2 cup cashews
1/3 cup water
Juice of 1 lemon
1 T olive oil
1 T apple cider vinegar
1/2 T maple syrup
Salt and pepper

1. Place the farro, quinoa, and lentils in a fine-mesh strainer. Rinse well. Place in a small pot and cover with 2 cups water. Add a generous pinch of salt. Cover, bring to a boil, and then reduce the heat and simmer 12 minutes. Drain well.
2. Meanwhile, set up a steamer basket over simmering water.  Add the sweet potatoes, cover, and steam 4 minutes. Add the green beans on top of the sweet potatoes, cover, and steam an additional 8 minutes. Test a bean and steam another minute or two if it is not tender to your liking. Drain. Season with salt.
3. Meanwhile, place the cabbage in a small mixing bowl. Drizzle with olive oil, add a generous pinch of salt, and squeeze over the juice of 1 lime. Very briefly mix together with your hands, gently massaging the cabbage to help it get just a touch tender.
4. Meanwhile, make the dressing. Place the garlic and ginger in a food processor or mini chopper. Process until very finely minced. Add the cashews and process until the mixture resembles sand. Add the remaining sauce ingredients and process until smooth, scraping down the sides a few times.
5. To serve, spoon some of the farro-quinoa-lentil mixture into each bowl. Drizzle with a spoonful of the sauce. Top with the cabbage, green beans, and sweet potatoes, and drizzle with more sauce.


Monday, November 24, 2014

Creamy Chicken Enchiladas

I have made a couple of enchilada recipes from Budget Bytes -- I love her homemade enchilada sauce, and the fillings are always hearty and satisfying.  This version might be my favorite one yet.  Shredded chicken is combined with black beans and corn, and then the filling mixed into super creamy tomato-cream cheese sauce.  Despite the longish list of ingredients, the filling comes together fairly quickly and then gets rolled inside tortillas.  The enchialadas are smothered in a homemade enchilada sauce -- it's way better than storebought sauce, and is easy to make with pantry ingredients.  Finally, I couldn't resist sprinkling a little cheese on top.  The result is gooey, cheesy, slightly spicy enchiladas that are total comfort food.  If you have leftovers, they keep well for lunch the next day.


Creamy Chicken Enchiladas (adapted from Budget Bytes, original recipe here)
Serves 4

For the sauce:
2 T vegetable oil
2 T flour
2 T chili powder
2 cups chicken broth or water
3 ounces tomato paste
1/2 tsp cumin
1/2 garlic powder
1/4 tsp Aleppo pepper or cayenne pepper (to taste)
1/2 tsp salt

For the enchiladas:
15 ounce can diced tomatoes with green chiles
1 tsp garlic powder
1/2 tsp cumin
4 ounce cream cheese, cut into 4 pieces
2 cups chopped or shredded cooked chicken
15 ounce can black beans, drained and rinsed
1 cup frozen corn
Eight to ten 8-inch tortillas (I used tortillas that were made with a combination of corn and wheat flours)
1 cup shredded sharp cheddar cheese

1. Make the sauce.  Combine the oil, flour, and chili powder in a medium pot.  Turn the heat to medium, and whisk the ingredients to combine.  When the mixture begins to bubble, let it bubble, whisking constantly, for one minute -- the mixture will be very thick.
2.  Whisk in the chicken broth a bit at a time, and then add the tomato paste, cumin, garlic powder, Aleppo or cayenne pepper, and salt.  Whisk until smooth, and bring to a simmer.  Once the mixture thickens slightly, taste and adjust for seasoning.  Set aside.
3. Preheat the oven to 350 degrees.
4. Heat a large, non-stick skillet over medium high heat.  Add the diced tomatoes, garlic powder, and cumin and bring to a boil.  Lower the heat and simmer for about 5 minutes, until the tomato liquid has thickened slightly.  Add the cream cheese and stir until it is melted and the mixture is combined.
5. Stir in the chicken, black beans, and corn.  Cook for a few minutes, until everything is heated through.
6. Spoon a thin layer of the sauce into the bottom of a 9x13 baking dish.
7. Scoop a heaping 1/3 cup of the chicken mixture into a tortilla and roll it up.  Place in the baking dish.  Continue rolling the enchiladas until you have used up all your filling (you should get 8 to 10 enchiladas).
8. Pour the rest of the enchilada sauce over the rolled enchiladas and spread it out evenly with a rubber spatula.  Sprinkle with the cheese.
9. Bake for 25-40 minutes, until the sauce is bubbling and the enchiladas are as crispy as you like them.  (I don't like mine very crispy, so I pulled them out on the sooner end, but do as you like!)

Friday, November 21, 2014

Shrimp and Grits

I'm a huge fan of shrimp and grits, and this dish hits the spot with some added veggies.  The recipe comes together surprisingly quickly.  The trick is to cook the grits in a pot with non-stick coating so that you don't have to stir constantly and can prepare the shrimp and vegetables while the grits bubble on the stove.  I've found that a non-stick pot plus a vigorous whisk every few minutes will result in smooth, delicious grits without having to stand over the pot the entire time.  Just make sure to use a silicone-coated whisk so that you don't destroy the coating on the pot and get non-stick flakes in your food (ew).  These grits are enriched with Monterey Jack cheese and scallions, which makes them even more tasty than usual.  On top are shrimp sauteed with peppers, onions, fennel, and tomatoes, which makes for a great combination.  I went with small shrimp to save money, but of course you can use larger shrimp if you're serving this for company or in the mood for a splurge.


Shrimp and Grits (adapted from Good and Cheap by Leanne Brown)
Serves 4

For the grits
1 cup grits or polenta
4-1/2 cups chicken stock
1/2 cup grated Monterey Jack cheese
3 scallions, white and light green parts chopped
Salt

For the shrimp
1 pound shrimp, peeled and deveined
1 T vegetable oil
1/2 large onion, peeled and chopped
1/2 fennel bulb, trimmed and chopped
1 bell pepper, trimmed and chopped
1 garlic clove, minced
1 chili, minced (choose something hotter or milder depending on your taste, or add a pinch of chili flakes)
2 plum tomatoes, chopped
Salt

1. Bring the stock to a boil in a medium non-stick pot, and whisk in the cornmeal while stirring constantly.  Turn the heat down to low, and continue to whisk vigorously every couple of minutes or so while you work on the rest of the dish and let the grits bubble away.  The grits should take about 15-30 minutes total...they're flexible.
2. Pat the shrimp dry with paper towels. 
3. Heat a large skillet over medium-high heat and add the oil.  When it's hot, add the shrimp in a single layer.  Cook just a minute or so on each side, trying to get a little color on the shrimp.  Then transfer to a plate and set aside.
4. Add the onion, fennel, and bell pepper to the skillet and turn the heat down to medium.  Add a bit more oil if needed to keep the vegetables from sticking.  Saute until the vegetables are just starting to soften 3-4 minutes.  Add the garlic and chili, and cook for another couple of minutes.  Add the tomatoes, and cook for another 3-4 minutes until the tomatoes release their juices and the vegetable mixture is looking saucy.  Season generously with salt.  
5. When the grits are looking just about ready, whisk vigorously and then whisk in the cheese and scallions along with a bit of salt.  Let cook another couple of minutes to melt the cheese and soften the scallions.
6. Stir the shrimp into the vegetable sauce, and cook until they are hot and cooked through.
7. Serve the shrimp and vegetables over the grits.

Tuesday, November 18, 2014

Extra-Crispy Bar-Style Tortilla Pizza

This recipe is total genius, and I've made it probably five or six times since discovering it!  It's actually so simple that I hesitated to post it, but I decided I liked it so much that I had to share.

While I love "real" pizza, I am also a big fan of English muffin pizzas, pita pizzas, and naan pizzas -- nothing beats super fast pizza, and these versions are all delicious.  However, this tortilla pizza is now my new favorite of all these cheater pizzas.  The bottom of the tortilla gets super crisp, and the size is perfect for one person.  Because the crust is so thin, this is really all about the toppings, which is what you want when you're not going to be using high-quality pizza dough.  And, it super fast! Win-win-win.

The only caveat here is that a cast iron pan is definitely a necessity.  A non-stick skillet is not safe to use under the broiler, and the thick cast iron is needed to get the crust super crispy.  Luckily cast iron pans are inexpensive and can be used for lots of tasks, so it's a worthwhile investment for more than just pizza.  ;)  Make sure to purchase tortillas that are the same size as your pan so you don't end up with cheese overflow.


Extra-Crispy Bar-Style Tortilla Pizza (adapted from Serious Eats, original recipe here)
Serves 1, easily multiplied

Olive oil
1 flour tortilla, of the same size as your cast iron skillet (mine is 8 inches, so I bought 8-inch tortillas)
Tomato sauce
Shredded whole milk mozzarella cheese
Pepperoni (or any other toppings you like)

1. Place your oven rack about 6-8 inches from the broiler element, and preheat the broiler to high.
2. Heat a cast iron skillet over medium-high heat.  Add a bit of oil, and heat until shimmering.  Wipe out the excess oil with a paper towel.
3. Place the tortilla with the rougher-textured side facing down (the side with the larger air bubbles should be facing up).
4. Spoon a thin layer of tomato sauce over the tortilla and spread evenly.  Sprinkle on the cheese, and arrange your pepperoni or other toppings over the cheese.
5. Pop the whole thing under the broiler for 2-3 minutes.  Keep a close eye to make sure your pizza doesn't burn.
6. Carefully transfer the pizza to a plate and cut into slices.

Saturday, November 15, 2014

Roasted Salmon with Lemon Peas and Artichokes

I have recently become fairly obsessed with Nigel Slater's new cookbook Eat.  It's full of mostly fast dishes that are seriously creative.  It also encourages improvisation on the part of the reader -- for example, this recipe starts off telling you to cook the salmon without any further instruction.  So, it's great for an experienced cook (or one who doesn't mind resorting to Google), but would probably frustrate a newbie.

I've marked about half the recipes as ones I want to make, because the combinations are just really striking.  Like this one -- salmon and marinated artichokes.  I would definitely not have put them together, but they are absoultely fantastic, with the acid from the artichokes pairing perfectly with the rich fish.  I accidentally bought a too-small jar of marinated artichokes, so I threw in some bonus peas to bulk up the vegetable component -- you could go either way with adding more artichokes and skipping the peas if you like.  But, definitely do not skip the lemon because the acid is crucial here.  This is a bright dish -- perfect to wake you up on a chilly fall evening.


Roasted Salmon with Lemon Peas and Artichokes (adapted from Nigel Slater's Eat)
Serves 2

2 skin-on salmon fillets
Salt and pepper
1 small jar marinated artichoke hearts
Olive oil
1/2 cup frozen peas, thawed
A few tablespoons fresh herbs -- I used fresh basil and fennel fronds
1 lemon

1. Preheat the oven to 400 degrees and line a baking sheet with foil.  Spray with a little oil.
2. Place the salmon on the baking sheet, skin-side-down.  Season with salt and pepper.
3. Bake the salmon for 20-25 minutes, until cooked through. The cooking time will depend on how thick your fillets are.
4. In the last few minutes of cooking time, heat a large non-stick skillet over medium-high heat.  Add the artichoke hearts, and cook for 5 minutes or so, until they are nicely browned.
5. Turn the heat down to medium-low, and add a splash of olive oil, along with the peas and herbs.  Cook for just a minute or two, and then squeeze half of the lemon over the pan and remove from the heat.
6. When the salmon is done, top with the artichoke-pea mixture and squeeze over more lemon juice, to taste.

Wednesday, November 12, 2014

Chocolate-Cherry-Coconut Baked Oatmeal

First up: a giveaway winner! Congratulations to Monica for winning a copy of Woman's Day Easy Everyday Lighter Dinners.  Look for an email in your inbox with details.

Next up: most awesome dessert-for-breakfast ever!  I have a huge sweet tooth, and I love sweet breakfasts.  This baked oatmeal feels rich and decadent with cherries, chocolate chips, and coconut.  But, it's also got whole grains, fruit, protein, and fiber, so it's way more satisfying than a donut.  I definitely wouldn't call it a health food, but if you're going to go sweet in the morning, I do think it's a better option than pastries!  Right out of the oven, the baked oatmeal is a little custard-y and surprisingly light.  Leftovers are also very tasty -- either heated up in the microwave for about 30 seconds, or just eaten cold as a breakfast "bar." So, this is a great item to make on the weekend and then stash in the fridge for breakfast throughout the week.

Note: I used whipping cream because it's what I had on hand, but you could certainly substitute the cream + water for low fat milk.  This oatmeal is also very sweet, which I liked...but, if you have less of a sweet tooth, you might want to cut the maple syrup down to 1/4 cup.


Chocolate-Cherry-Coconut Baked Oatmeal

Serves 9

Spray oil
2 cups rolled oats
Generous pinch of salt
1/2 cup chocolate chips, divided
1 cup whipping cream
1 cup water
1 egg
1/3 cup maple syrup
3 T melted coconut oil, divided
1 tsp vanilla
1/2 cup cherries, chopped (frozen + thawed works well)
1/3 cup coconut flakes

1. Spray an 8x8 pan with oil. Preheat the oven to 375 degrees.
2. Stir together the oats, salt, and about half the chocolate chips.  Set aside.
3. Whisk together the cream, water, egg, maple syrup, half the coconut oil, and the vanilla.  Set aside the remaining coconut oil.
4. Pour the oat mixture into the prepared pan and pour the cream mixture on top.  Push any floating oats under the cream with a spoon and tap the pan on the counter a few times to make sure everything is nicely distributed.
5. Scatter the reserved chocolate chips on top, followed by the cherries.  Top with a generous sprinkle of coconut flakes.
6. Bake about 35 minutes, until the oats are set and the coconut is toasted. Remove from the oven, and drizzle with the reserved coconut oil (remelt if needed).
7. Let rest for 10 minutes before serving.

Saturday, November 8, 2014

Crispy Chicken with Fennel-Apple Slaw

This is the second recipe I tried from Woman's Day Easy Everyday Lighter Dinners, and like the BBQ pork dish I posted earlier this week, it proved to be quick and tasty.  I'm giving away a free copy of this cookbook to my readers: click here to enter to win!

I was a little skeptical of this chicken recipe, because I usually do a three-stage set-up for coating crispy chicken: flour, egg, and then panko or breadcrumbs.  In this case, the recipe jumps straight for the panko.  Luckily, the coating stayed on nicely and crisped up in the oil.  I had a little trouble with getting the chicken to cook evenly -- damn you electric stove! -- but overall the chicken tenders were crispy and tasty.  Because they don't have a lot of extra seasoning, I definitely recommend serving them with some sort of dipping sauce -- I used blue cheese sauce left `over from these bacon-roasted potatoes, and Tim chose Dijon mustard. Ketchup, barbecue sauce, or any other sauces you have in your fridge would all work nicely.

On the side is a creamy Dijon slaw.  The original recipe featured apple and celery, but as many of my readers know, I'm not a big fan of celery.  I substitute fennel in most recipes that call for celery, and it worked out very well here. The anise flavor of the fennel pairs very well with the sweet apple and creamy, tangy dressing, and the crunch of this slaw is fantastic.  Of course, if you're a fennel-hater, you can use the original celery -- 2 stalks, thinly sliced on the diagonal.


Crispy Chicken with Fennel-Apple Slaw (adapted from Woman's Day Easy Everyday Lighter Dinners)
Serves 3-4

3/4 cup panko
Salt and pepper
About 1 pound chicken tenders
Olive oil
1/4 cup lowfat sour cream
1 tsp Dijon mustard
1 T freshly squeezed lemon juice
1 fennel bulb, trimmed and very thinly sliced
1 Granny Smith apple, very thinly sliced
1 T minced chives

1. Season the panko with 1/2 tsp salt and 1/4 tsp pepper.  Spread out on a large, shallow plate.
2. Coat the chicken with the panko, pressing gently to help it adhere.
3. Heat 2 T oil in a large, nonstick skillet over medium-high heat.  Cook the chicken until golden brown and cooked through, about 2-3 minutes per side.  Add more oil to the skillet as needed.  You will likely need to do this in 2 batches, depending on the size of your pan.
4. Meanwhile, make the slaw.  In a large bowl, whisk together the sour cream, mustard, lemon juice, and 1 T olive oil.  Season with salt and pepper. Add the fennel and apple, and toss to combine.  Gently fold in the chives.
5. Serve the chicken with the creamy slaw.

I was sent a free copy of this cookbook to review. All recipe testing and opinions are my own.

Wednesday, November 5, 2014

Giveaway + Quick BBQ Pork Chops with Green Rice

I was recently sent a copy of Woman's Day Easy Everyday Lighter Dinners to review.  And, I have a copy to give away to one of my readers -- see below!

Ever since I started working more regular hours since finishing my dissertation, I've been on the lookout for healthy, quick recipes to make during the week.  This book definitely fills that need -- almost all the recipes can be on the table in less than half an hour, and all provide both calorie and cost information.  And, they're honest about the time committment -- I've made a lot of supposedly "thirty-minute meals" that really take up to an hour.  In this case, I found the time estimates to be pretty accurate.  I've made a couple of recipes out of it so far, and have been really happy with both -- they provided lots of flavor for minimal effort, and they didn't break the bank either.

First up is this tasty BBQ pork chop dish.  Actually, it's supposed to be a pork tenderloin.  For some reason, the only pork tenderloin we could find at the grocery was almost $20 (!!!!!), so we went with thin cut pork chops instead.  I don't know what was going on with the pork tenderloin, since usually it's an inexpensive cut...in any case, the pork chops were an easy swap and cooked even more quickly.  The sauce is sweet and sticky, and really makes basic pork chops interesting.  You could also use it on thick-cut chops if you're in the mood for a more indulgent meal -- just cook them a little longer.

The chops are paired with a genius rice recipe.  I love white rice as a side dish, but I'm well aware it's not the most healthy choice.  Here, the rice is paired with veggies in approximately equal parts, so you're getting plenty of good green stuff without losing the comfort-food quality of white rice.  Add a simply-prepared fruit or veggie to complete your plate (I served cubed honeydew melon).

Overall, I'd recommend this book to anyone who wants a solid collection of fast, inexpensive, and healthy recipes.  You won't find anything terribly adventureous or "out there,"  but on the plus side that means all the ingredients should be easy to find at any grocery store.  These recipes are great for weeknights, or any other time when you want to be able to come in the door and get dinner on the table quickly.

Lucky you -- Sterling Publishing was nice enough to offer up a copy of Woman's Day Easy Everyday Lighter Dinners for one of my readers!  If you'd like to win, just comment below with your favorite lighter dinner recipe.  Make sure you leave a way for me to contact you if you win!  I'll pick a winner on November 12.


Quick BBQ Pork Chops with Green Rice (adapted from Woman's Day Easy Everyday Lighter Dinners)
Serves 4

2 T ketchup
2 T soy sauce
2 T packed light brown sugar
1 T finely grated fresh ginger
1/2 tsp chili powder
4 thin-cut pork chops
1/2 cup Jasmine rice
Salt
1 cup frozen edamame, thawed
2 scallions, white and green parts thinly sliced
4 ounces snap peas, thinly sliced crosswise (thaw if frozen)
Olive oil, for the pan
Pepper
Toasted sesame seeds, to serve

1. Whisk together the ketchup, soy sauce, brown sugar, ginger, and chili powder in a large bowl.  Add the pork chops and toss until they are completely coated.  Set aside while you prepare the rice.
2. Rinse the rice well, and then combine with 3/4 water and a generous pinch of salt in a small pot with a tight-fitting lid.  Cover, bring to a boil, and then reduce heat and simmer 18 minutes.  Don't peek!  
3. While the rice is cooking, prepare the pork chops.  They'll need about 6-8 minutes, so start them when the rice is about halfway done. Heat a large skillet over medium-high heat and drizzle with olive oil.  When the oil is hot, add the chops and cook 3-4 minutes on each side, or until cooked through (will depend on thickness).
4. When the rice is cooked, fluff with a fork, and then stir in the edamame, scallions, and snap peas.  Season with salt and pepper.
5. Serve the pork chops and rice sprinkled with toasted sesame seeds.

I was sent a free copy of this cookbook to review.  All recipe testing and opinions are my own.

Sunday, November 2, 2014

SRC: Chicken with Pecan-Cider Gravy

My partner for this month's Secret Recipe Club was Lesa of Edesia's Notebook.  I had no trouble picking the perfect recipe to cook from her blog -- right on her front page was a chicken dish with pecan-cider gravy, and I was instantly sold! This is the perfect autumn dish -- warm, nutty, and apple-y!  This is such a great use of apple cider. I would never have thought to use cider in a gravy, but it's fantastic.  If you skip the pecans, it would also be awesome on mashed potatoes.  Here, it makes boring chicken cutlets instantly delicious!  Lesa suggested brown rice on the side, and I agree -- the nutty flavor goes really well with the pecans in the gravy.  Add some roasted veggies (here, I used carrots, zucchini, and potatoes) and you've got the perfect meal to warm up a chilly fall evening.


Chicken with Pecan-Cider Gravy (adapted from Edesia's Notebook, original recipe here)
Serves 3-4

3/4 cup chopped pecans
1 T olive oil
About 1 pound chicken breast cutlets
Salt and pepper
1 T butter
2 T flour
1/2 cup apple cider
1 cup chicken stock
1 dried bay leaf

1. Heat a large, non-stick skillet over medium high heat.  Add the pecans and toast until fragrant.  Transfer to a bowl and set aside.
2. In the same skillet, heat the olive oil until shimmering.  Add the chicken, season with salt and pepper, and cook until nicely browned and cooked through -- mine needed just a few minutes on each side, but go by how thick your chicken cutlets are (mine were quite thin).  You may need to work in batches depending on the size of your chicken.
3. When the chicken is cooked through, remove to a plate and cover with foil. Set aside.
4. In the same skillet, melt the butter,  Whisk in the flour, and cook for a minute.  Slowly whisk in the cider, followed by the chicken stock.  Add the bay leaf.
5. Bring the gravy to a boil, and then reduce the heat and simmer until thickened (8-10 mintues or so).  Season with salt and pepper to taste.  Fish out the bay leaf and discard.
6. When the gravy has thickened to your liking, stir in the reserved pecans.  Serve over the chicken cutlets.