The theme for this month's
You Want Pies with That? is "Lifestyles of the Rich and Famous." We could draw our inspiration from any famous person, and I chose Amy Adams. She's going to be playing Julie in the upcoming cooking movie
Julie & Julia, which I can't wait for because I
loved the book. Adams also played Giselle in
Enchanted, and so I wanted to make a pie fit for a princess. :) I also wanted to do a pie with Meyer lemons and strawberries because those are both plentiful here at the moment, and they're also so delicious together. I thought they would make the perfect pie for Amy Adams since she has strawberry blonde hair (strawberries + lemon...sort of works, right?).
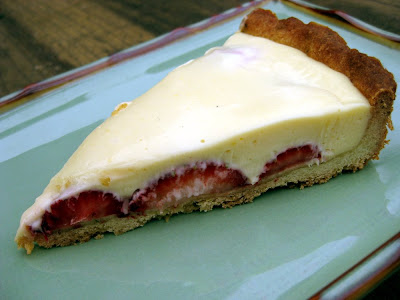
After reading about this
Strawberry and Lemon Curd Galette in Thyme Crust on
Dishing Up Delights, I knew I wanted to do a thyme crust for my tart, so I combined the flavors of strawberries, lemons, and lemon thyme with Dorie Greenspan's famous lemon cream tart. The result was amazing! We pretty much demolished the tart in an evening, although I saved out a slice to photograph in natural light the next morning. The lemon cream was absolutely delicious, and the sweet berries cut the tartness of the lemon filling nicely. Dorie's shortbread tart crust is always a winner, although I couldn't really taste the lemon thyme; next time I'd add twice as much (4 teaspoons). If you can't find lemon thyme, feel free to substitute regular thyme or another herb.
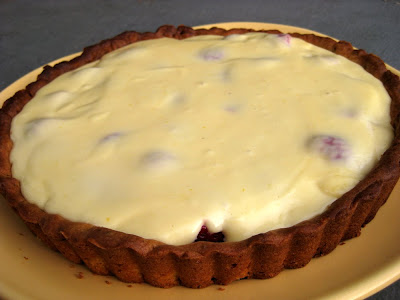
 Meyer Lemon-Strawberry Spring Tart
 (inspired by Dorie Greenspan and
Dishing Up Delights)
Serves 4-5
1 Lemon Thyme Shortbread Crust, fully cooked (recipe below)
1/2 cup sugar
Finely grated zest of 2 Meyer lemons
2 large eggs
6 T freshly squeezed Meyer lemon juice (from about 3 lemons)
1 stick plus 2 T unsalted butter, at room temperature and cut into tablespoon-sized pieces
1-2 pints strawberries (depending on the size of the strawberries)
Getting ready: Have a thermometer, preferably an instant-read, a strainer and a blender (first choice) or food processor at the ready. Bring a few inches of water to a simmer in a saucepan.
1. Put the sugar and zest in a large metal bowl that can be fitted into the pan of simmering water. Off heat, work the sugar and zest together between your fingers until the sugar is moist, grainy and very aromatic. Whisk in the eggs followed by the lemon juice.
2. Fit the bowl into the pan (make certain the water doesn’t touch the bottom of the bowl) and cook, stirring with the whisk as soon as the mixture feels tepid to the touch. You want to cook the cream until it reaches 180°F. As you whisk the cream over heat—and you must whisk constantly to keep the eggs from scrambling—you’ll see that the cream will start out light and foamy, then the bubbles will get bigger, and then, as the cream is getting closer to 180°F, it will start to thicken and the whisk will leave tracks. Heads up at this point—the tracks mean the cream is almost ready. Don’t stop whisking and don’t stop checking the temperature. And have patience—depending on how much heat you’re giving the cream, getting to temp can take as long as 10 minutes.
3. As soon as you reach 180°F, pull the cream from the heat and strain it into the container of a blender (or food processor); discard the zest. Let the cream rest at room temperature, stirring occasionally, until it cools to 140°F, about 10 minutes.
4. Turn the blender to high and, with the machine going, add the butter about 2 T at a time. Scrape down the sides of the container as needed while you’re incorporating the butter. Once the butter is in, keep the machine going—to get the perfect light, airy texture of lemon-cream dreams, you must continue to beat the cream for another 3 minutes. If your machine protests and gets a bit too hot, work in 1-minute intervals, giving the machine a little rest between beats.
5. Set the blender aside while you prepare the strawberries. Wash and dry the strawberries. Cut the top off each strawberry and slice in half, placing the cut side down on a paper towel to ensure that the wet centers don't get the crust soggy. Arrange the strawberries in concentric circles on the cooled tart crust.
6. Whirl the lemon cream in the blender for a few seconds to loosen it up, and then carefully pour it over the strawberries. Use the back of a rubber spatula to spread out the cream so it covers all of the berries.
7. Chill the tart in the refrigerator for a few hours before serving.
 Lemon Thyme Shortbread Crust
 (adapted from Dorie Greenspan)
1 1/2 cups all purpose flour
1/2 cup confectioners' sugar
1/4 tsp salt
2 tsp lemon thyme, leaves only (no need to chop; the food processor will do it for you)
1 stick plus 1 T very cold (or frozen) unsalted butter, cut into small pieces
1 large egg yolk
1. Put the flour, confectioners' sugar and salt in a food processor and pulse a couple of times. Scatter in the lemon thyme and the pieces of butter and pulse until the butter is coarsely cut in--some pieces the size of oatmeal flakes and some the size of peas. Stir the yolk to break it up, then add it a little at a time, pulsing after each addition. When the egg is in, process in long pulses--about 10 seconds each--until the dough forms clumps and curds. (The sound of the food processor will change just before the dough is ready.) Turn the dough out onto a work surface and knead very lightly, just to incorporate any stray dry ingredients.
2. Butter a 9-inch tart pan or pie plate and press the dough evenly over the bottom and sides. Use all but a little piece of dough, which you should store in the fridge to patch up any cracks later. Freeze the crust for at least 30 minutes or longer.
3. Preheat the oven to 375 degrees. Cover the crust with a piece of buttered aluminum foil (butter side down) and fit the foil tightly around the crust. Put the tart/pie pan on a baking sheet and bake 25 minutes. Remove the foil and flatten out the crust gently with the back of a spoon. Mine melted a little, so I just pushed it back up the sides and it wasn't a problem. Patch the crust if necessary with the dough from the fridge.
4. Return the crust to the oven and bake for another 8 minutes until golden brown. Transfer to a rack and cool to room temperature.
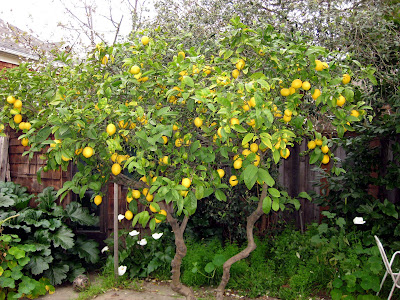
Do you need any Meyer lemons? We have too many to use!
 I used pencil asparagus as my other veggie in this dish, both because it was on sale and because I knew it would roast quickly (i.e. in the time it took to make the sauce!). You could definitely use larger asparagus; just peel it and leave more time to roast. I think other veggies like broccolini would also be great--anything that you think would taste good with roasted red pepper.
 I'm submitting this post to this week's Presto Pasta Nights. Be sure to check out the other entries at Once Upon a Feast on May 1.


